Making the Image » You Can Sleep When You're Dead: Blog by Colleen Miniuk » Page 12

Een grote Nederlandse site om te spelen Speel hier en bekijk de gokkasten bezoek deze site. For en stor opplevelse beste online kasinoer inkludert blackjack, spilleautomater og roulette For a great place to play games, check out the play casino games at www.canada-casinos.net where you can play a variety of games. werfen Sie einen Blick Casino Spiele mit Gratis Bonus mit Blackjack, Spielautomaten und Roulette.Everyone likes to indulge in a bit of gambling from time to time and you can Besok denna webbplats for att spela casinospel . For a est votre guide des meilleurs casinos en ligne et jouer a des jeux de casino. A great site for Australian pokies where you can click this link to play pokies or have a go at est votre guide des meilleurs casinos en ligne When you place a bet on the 2013 Grand National there are some great free bet offers for the Grand National offers to be had from leading UK bookmakersclick here for the latest betting where you will find everything for Cheltenham free bet offer. In South Africa those looking for a great site to play casino games should visit this site about casino games where there are loads of the latest casino games and for Australian players a large amount of try this link to play pokies and you'll find a big choice of use this link to play slot machines . besoka denna kasino Besok denna webbplats for att spela casinospel. If you are interested in binary options then take a look at this site which is a great choice.

Dec 152014
 
Share
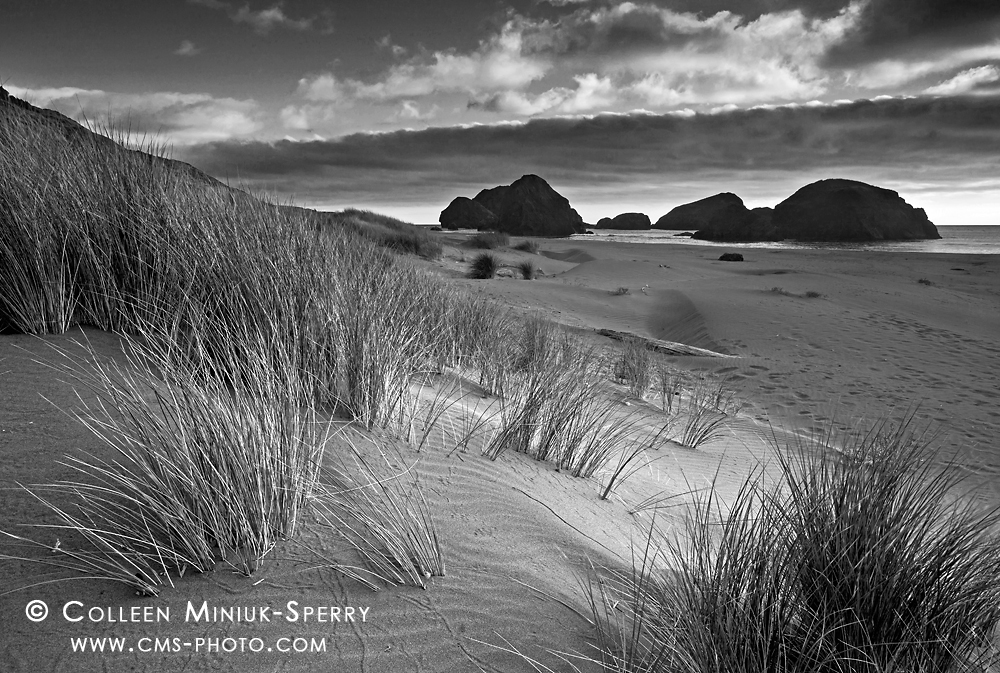
OR_Nehalem Bay State Park_00002_BW_c

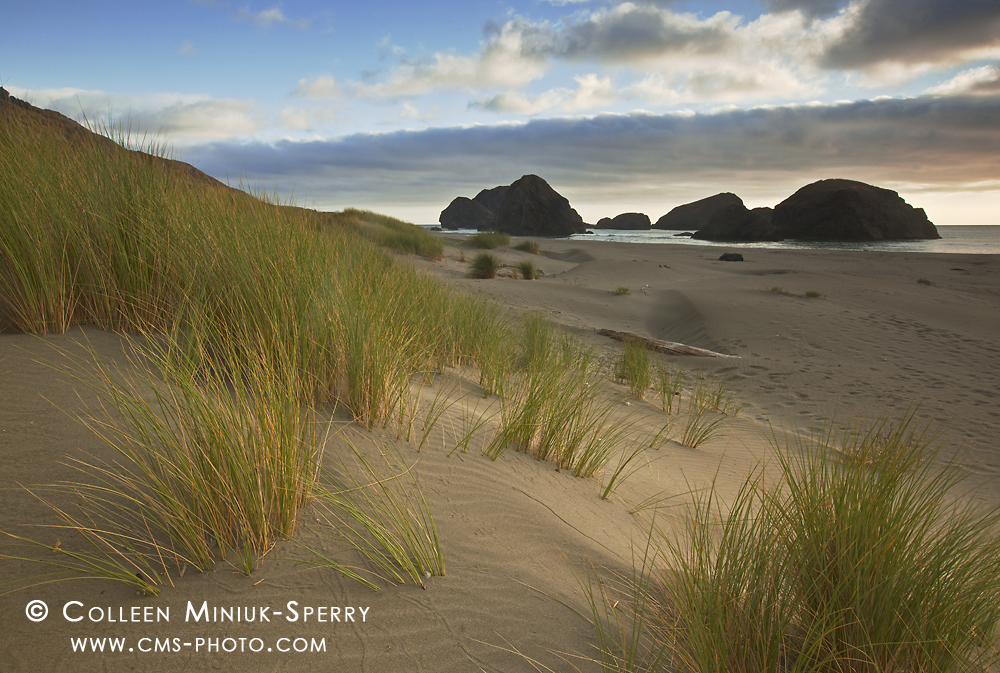
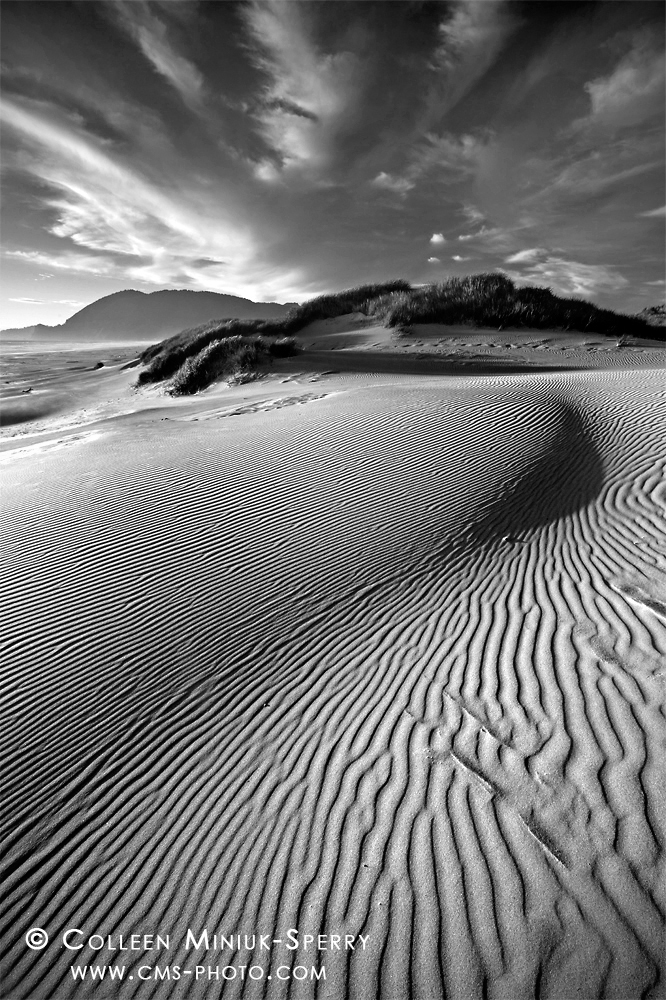
Day 4: “Spellbound by Sand.”Sand dunes in wind-swept patterns on the beach at Nehalem Bay State Park, Oregon (Prints available for purchase – click on photo to order yours!)

After seeing how much texture the black and white conversion brought out in my Day 2 Black and White Challenge submission, “Down by the Sea“–and liking it!–I decided to try dropping the color out on other Oregon coast shots I had made.  I dug up  a few photos, including a vertical image called, “Spellbound by Sand” (some might recognize its horizontal sister image, “The Constancy of Change“) from my wanderings at Nehalem Bay State Park from two summers ago:
Spellbound by Sand

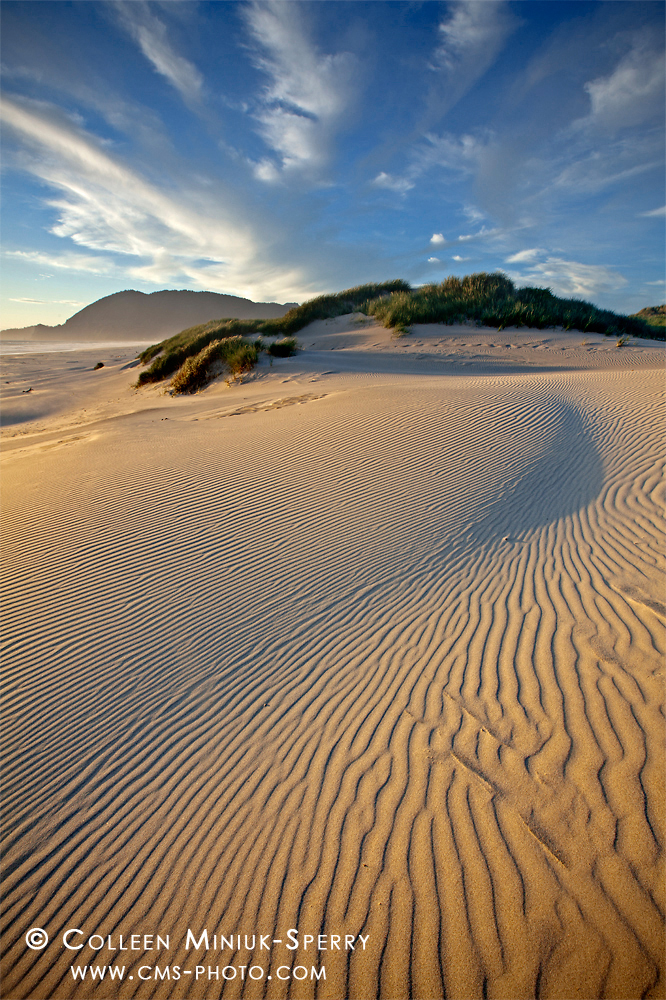
The original color version of “Spellbound by Sand.” (Prints available for purchase – click on photo to order yours!)

With the setting sun approaching the horizon, the light and shadows seemed to literally dance across the sand dunes.  The howling and unrelenting wind added to this effect, of course (and kept the area free of footprints!).  Focused on emphasizing this perception, I positioned my tripod about waist-high and pointed my wide-angle lens (i.e. 16mm) down towards the dunes.  The distorted perspective allowed me to seemingly elongated the lines in the sand and to fill the frame with my primary subject.

To maximize my depth of field, I used an f/16 and focused at the hyperfocal distance for my lens and aperture setting (i.e. 2.82  feet away from my camera, according to the DOF Master, dofmaster.com).  At an ISO speed of 100, a shutter speed of 1/10th second resulted.  Knowing if I exposed for the land, the sky would appear overexposed and blown out (and if I exposed for the sky, the land would appear underexposed and too dark), I placed a three-stop graduated neutral density filter over my lens to hold back light in the sky.

Before snapping the shutter, I followed the dominant lines around my frame, taking great care in ensuring the lines did not lead the eye out of the frame.  As I shifted a little to the left, then a little to the right, and then settled in on a composition I liked, I noticed the strongest lines originate from the bottom left corner, travel to the small mound off to the right near the middle, and then push into the explosive-looking sky.  I knew from the moment of capture, this photograph possessed a great deal of energy given the lines in the sand and the backdrop Mother Nature provided in the clouds.  I liked that the image conveyed how I felt about the scene – in words, an emphatic and enthusiastic “WHOOHOO!”

When I experimented with converting the image into a monochromatic one, the black and white format transformed into a trippy–almost spastic!–mesmerizing optical illusion.  If you look at it long enough, the sand looks as if it’s moving!  In post-processing, I increased the contrast in the sand to amplify the effect even more so.  Like my Day 2 photograph, “Down by the Sea,”  the monochromatic treatment emphasized the alternating highlights and shadows in the foreground and created a greater feeling of dimension to the final image.

Which version do you prefer: the black and white or the color image?  And why?  Leave me your thoughts in the Comments section below.  I’d love to hear from you.

There are a whole slew of tremendously talented photographers working primarily in black and white.  One of those is my buddy, Chuck Kimmerle.  Chuck already completed the Black and White Challenge by sharing some lovely work.  But I think he might have gotten off this challenge too easy (since he works almost exclusively in monochrome).  With a little twist on the assignment, I challenge Chuck to post five COLOR photographs over the course of five days.

On to Day 5 tomorrow!

~Colleen

Dec 122014
 
Share
The Network_BW

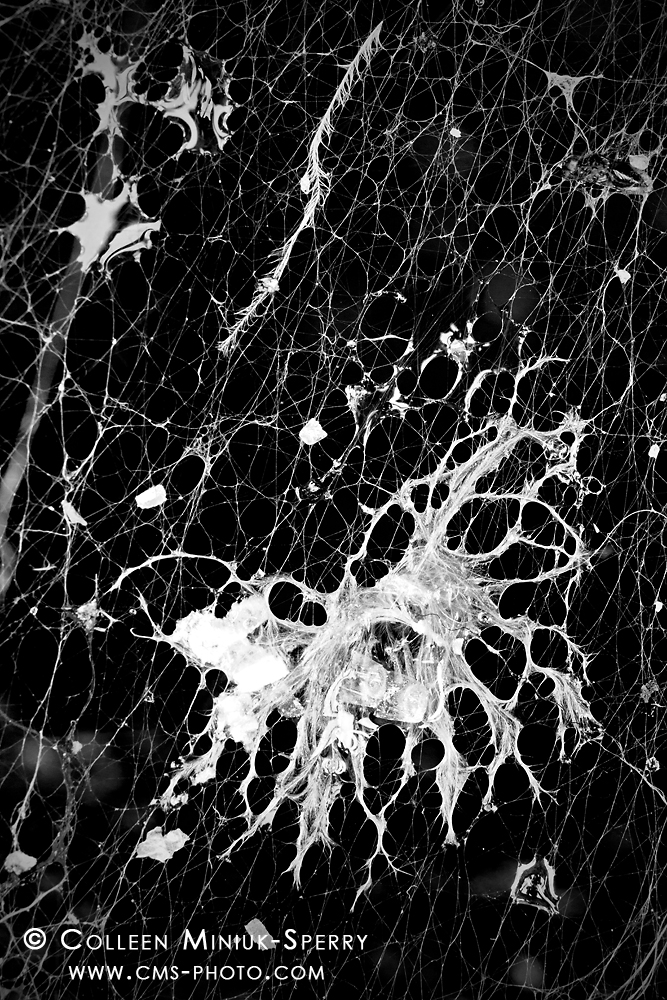
Day 3: “The Network.” Feathers, water droplets, and other materials float in a spider’s web on Schoodic Point on the Schoodic Peninsula in Acadia National Park, Maine (Prints available for purchase – click on photo to order yours!)

For Day 3 of 5 in the Facebook Black and White Challenge, I am excited to share a new abstract piece (above) titled, “The Network” from the Schoodic Point on the Schoodic Peninsula in Acadia National Park, Maine.

Amidst a whirlwind schedule of book signings and presentations in Acadia this past August, I managed to escape to Schoodic Point for an afternoon of revitalization and refreshment.  With no intentions or expectations of photographing, I simply strolled along the strikingly beautiful pink granite ledges at one of the park’s most scenic overlooks.

Having visited the point likely 60-70 times over the last four years, I continue to find scenes and things that amaze me–from the gi-normous waves explosively greeting the Maine coast to the way the granite and basalt dikes intertwine.  I never know from trip to trip whether the landscape or the smaller details will be the first to reach out and grab my soul.  Either way, Schoodic Point seems to speak to me every time I come to say hello.

On this particular visit, one minute I was watching the waves in quiet reverie.  The next minute, as I turned my head away and spotted a small spider web strung across the boulders, I lost my mind, “OH MY GAWD, HOW AMAZING IS THAT?!!”

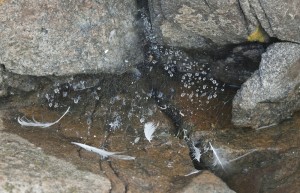
I rushed to the granite overhang to investigate my flash of perception more closely.  With my camera still in my backpack, I approached this 3-foot by 1-foot area with curiosity, appreciation, and admiration.  Truth be told (and perhaps not surprisingly, given my “air bubble” obsession), I was first draw to the water droplets suspended in between the threads (on the top right in the photo below).  The longer I studied this arrangement, though, the more I connected with a large clump of unidentifiable material in between the feathers.  Was it decaying feathers?  Fur from an animal?  A dead animal?  When the creative flow hits, you do not ask many questions.  You go with the flow–which is exactly what I did as I set my equipment up to make an image.

The Network scene

The scene of the scene: a spider web strewn across the granite boulders at Schoodic Point. Had I picked my camera up and snapped immediately after having a flash of perception, this would have been the photographed that resulted. Instead of grabbing a camera, I investigated the scene and ask over and over, “What is it that I love about this scene.” This yielded a more focused, more meaningful image of the cluster of tangles in between the large three feathers on the left.

To get a closer perspective, I reversed the center column on tripod such that my camera dangled upside down.  With a macro and two extension tubes stacked, I knew my abilities to record anything but a ridiculously shallow depth of field would be tough.  So I positioned my lens parallel to my primary subject to maximize the appearance of focus across my frame. The setting sun grazed the boulders, so I placed my rain jacket across two of the tripod’s legs to help create a larger shadow (and block the wind) across my scene.

Given the coastal breeze, I made an “insurance shot” at ISO 640 using f/6.3 at 1/25th second.  I knew this frame would not render the depth of field I needed, but would allow me to freeze the moving web during the exposure.  I also knew it would yield a sufficient enough shot to give me the freedom to push my settings slower and try to expand my depth of field in additional frames without the risk of going home empty-handed (or with a bunch of blurry images on my memory card).

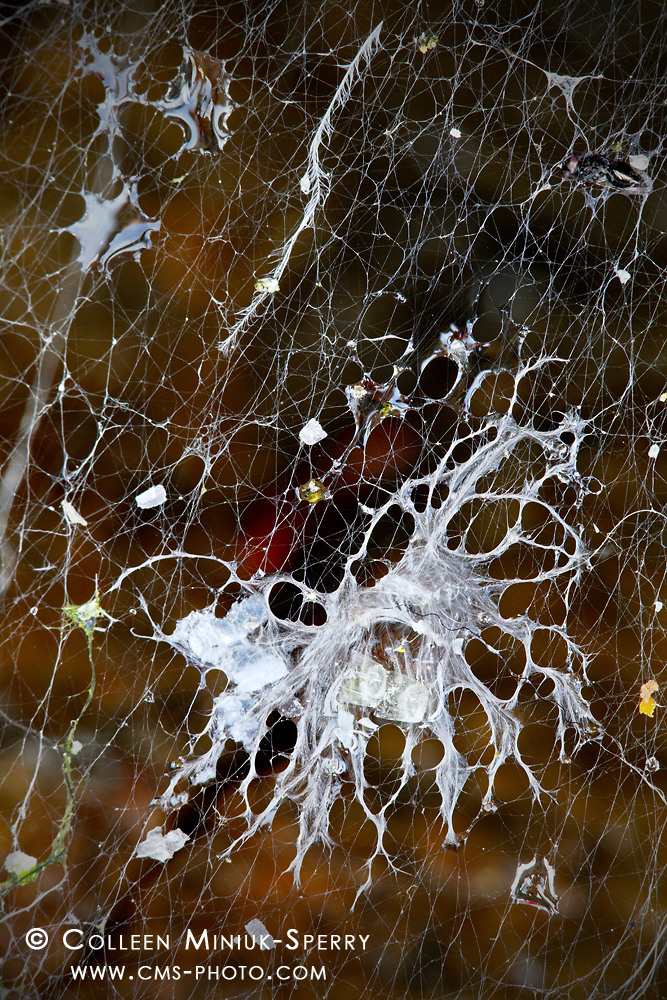
I dropped my ISO to 400 and stopped down to f/9, which resulted in a 1/4 second shutter speed.   With each lull in the wind, I snapped away on continuous shoot mode (a.k.a. “machine gun” mode) as the web danced in the afternoon winds.  After making a few series and reviewing the images on the camera’s LCD, I felt I had successfully recorded the photograph as I envisioned.  Here’s the original color photograph (post continues after photo):

The color original of "The Network"

The color original of “The Network” (Prints available for purchase – click on photo to order yours!)

However, when I began editing my images at home in Arizona, I liked the end result; surprisingly, I did not love the end result.  The reason(s) why alluded me.  I mean, everything seemingly fell into place when I photographed the web: I had passion about my subject.  I took ample time to develop a visualization of what my end results would look like.  I filled the frame with my subject.  I arranged the various elements to achieve asymmetrical balance.  Conditions provided conducive lighting.  My depth of field rendered an adequate amount of sharpness for the subject while blurring the background.  It was close, but not perfect.  I set the image aside.

Oftentimes, it helps to create distance between you and a problem as this allows you to collect new ideas and gain fresh perspectives in order to solve them.  When Floris van Breugel nominated me for the Black and White Challenge in late October, this image immediately popped into my head.  The monochromatic direction gave me just the boost I needed – a new idea to try!

I converted the image to black and white, and instantly my photograph became as creepy and weird and abstract as I saw on the granite ledges that August afternoon.  I originally believed the color background added to the chaos.  And in many ways, it does.  But when I dropped the color out, my vision for this scene finally came to life.  Now I love the end result!

Do you agree?  What differences do you see between the color and monochrome versions?  I’d enjoy hearing your thoughts in the Comments section below.

Since I have shared an image from Acadia National Park, I would like to nominate my good buddy, talented photographer, and best-selling author, Bob Thayer, to participate in the Black and White Challenge!  (If you have ever visited a gift shop near Acadia, you have no doubt seen his awesome books, “The Park Loop Road” and  “Acadia’s Carriage Roads.”)

On Monday, I’ll share Day 4’s photograph.  Have a great weekend, everyone!

~Colleen

Dec 112014
 
Share
Down by the Sea (monochromatic version)

Day 2: “Down by the Sea,” European beach grass lines the sandy shore at Pistol River State Park, Oregon (Prints available for purchase – click on photo to order yours!)

In my post yesterday’s “Day 1: The Black and White Challenge:  “In the Storm”, I introduced the Facebook Black and White Challenge (and my participation in it).  In this fun exercise, a person posts a black and white photograph on his or her Facebook page each day for five days.  Then, he or she challenge someone else to do the same each of those days.

For my Day 2 entry, I’m jumping from the Maine coast to the Oregon coast (my two loves)!

A cancellation in my schedule this past September left me with a rare 10-day time frame completely free of commitments.  With this gift, I did what any sane outdoor photographer would do:  I hopped into my truck and drove 22-hours from Arizona to the southern coast of Oregon!  (What we’ll do for love, huh?)

I have spent much time wandering the Oregon coastline over the years, but the majority of that time I spent happened in the more accessible middle and northern sections.  However, every time I drove from Gold Beach to Brookings (usually to visit northern California and other southerly locales), I said to myself, “If I ever have a week or two weeks to spare, I’m coming here to explore!”  So, by traveling so far, I wasn’t losing my mind; I was merely fulfilling my promise.

One of the many highlights from my impromptu road trip included exploring the Pistol River State Park.  For my first few visits, I did not make any photographs but rather simply soaked in what this special place had to offer.  Sure, some photographic ideas popped into my head, but they needed some time to simmer.

Towards the end of my trip, a nasty storm socked the coast in for a couple days.  I continued my explorations and made some new images in various locales north of Brookings, much of it in blissful solitude, even at the more popular stops.  After all, it was only rain!  (Have the Oregon coast to myself?  Don’t mind if I do!)

When the weather forecasts suggested the system might break (which was timed coincidentally with the next sunset), I headed back to Pistol River area for one final visit before returning home to the desert.  With the light dancing in and out of swiftly-moving clouds, I knelt on the sand beside clusters of European beach grass.  Using my visualizations as my guide (but modifying my original idea to respond to the fleeting lighting conditions), I adjusted my composition so as to achieve balance between the grasses, sand, sea stacks, and the ever-changing sky.

Through a wide-angle lens (i.e. 20mm) I used an ISO 100 and an aperture of f/16 with a shutter speed of 1/13 second.  I chose these specific settings to help balance my need for extensive depth of field and the perpetual movement in the grasses given the prevailing winds (which was strong enough to keep the beach grasses waving, but not enough to keep the animal and human footprints from disappearing in the sand).  Because of my close proximity of my camera to the grasses,  I would have liked to have used f/22 to see an extensive depth of field.  However, after experimenting with the slower shutter speed that setting caused, I didn’t like way the grasses appeared in the photo (too much movement and way too soft).

So I took a small step back from the grasses, set f/16 (still needed extensive DOF), and tried again with a 1/13th second shutter speed.  I really liked the combination of still and moving grasses this rendered – frozen enough to see what it was, but blurred enough to see the wind was moving.   Theoretically, if I wanted to freeze the motion of the grasses (which was not my goal), I could have bumped the ISO up to ~400 or 640, took another step back, opened my aperture to f/11 or f/8, and snapped away with a faster shutter speed.

My three-stop graduated neutral density filter helped to bring out detail in the clouds, but also darkened the off-shore rocks in the background. This resulted in the following color photograph (post continues after photo):

Down by the Sea

The original “Down by the Sea” in color (Prints available for purchase – click on photo to order yours!)

I definitely did not visualize converting this image to black and white when I snapped the shutter.  I did not even consider it when I arrived home and began processing the photos.  However, the Black and White Challenge caused me to rethink my approach with my pictures.  As I sorted through my images for this exercise, I had some interesting philosophical conversations with myself on things like, “How do various color impact a scene?” “What makes an effective black and white image?”  “How can I use both color and monochromatic techniques to improve my visual messages?”  When I experimented with converting this image to black and white, I felt like I was dusting off my traditional darkroom tools developed 11 years ago and putting them back into use to expand my creative toolbox today.

The monochromatic treatment emphasized the light and shadows alternating and working together in layers across the scene, more so than in the color version.  While I could have lightened the sea stacks in the background during post-processing (to overcome the underexposure from the graduated neutral density filter), I did the opposite.  I intentionally darkened the rocks in the monochromatic version to serve as a more dominant backdrop.  I felt this matched the more aggressive mood in the sky.  Both the darker backdrop and sky served as a juxtaposition to the more flowing, gentle grasses highlighted by a ray of sun in the foreground.

What do you think? Do you prefer the color or monochromatic version?  Why?  I’d enjoy hearing your thoughts in the Comments section below.

Since he started me on this challenge, I now re-nominate Floris van Breugel to finish his Black and White Challenge.  Only two more photographs to go, Floris!  You can do it!

Stay tuned for Day 3, thanks for stopping by,

~Colleen

Dec 102014
 
Share
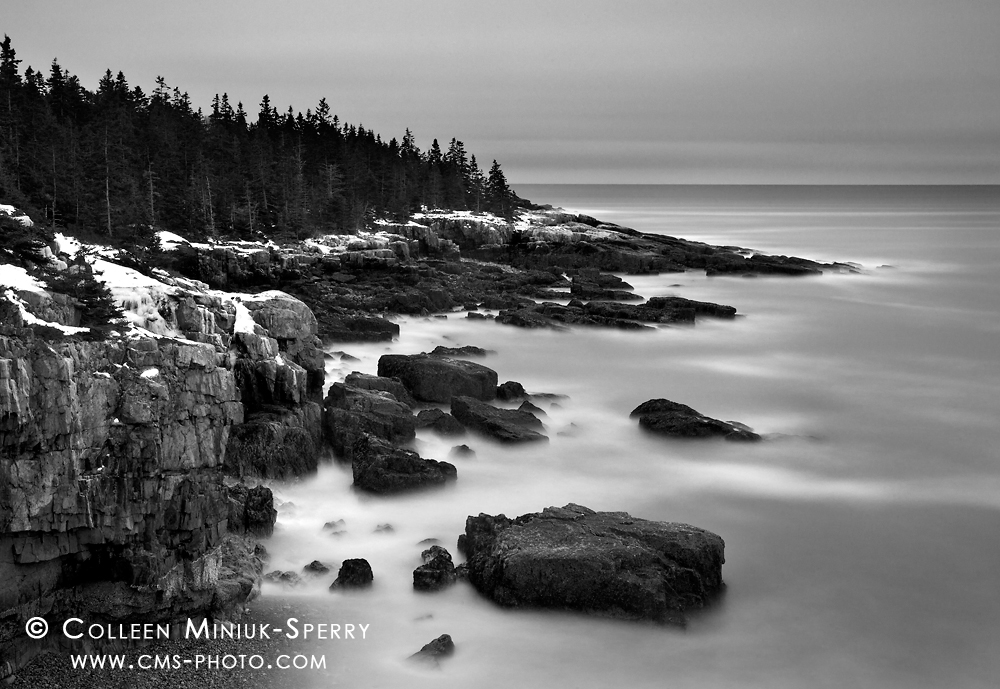
In the Storm

Day 1: “In the Storm,” waves roll into the Schoodic Peninsula’s rugged western coastline in Acadia National Park, Maine (Prints available for purchase – click on photo to order yours!)

If you have spent any time on Facebook in the last several months, chances are high you have run across the “Black and White Challenge” making its way from photographer to photographer.  For those unfamiliar with this social media experiment, it goes something like this:  Post a black and white photograph on your Facebook page each day for five days.  Then, challenge someone else to do the same each of those days.

Although I enjoy viewing monochromatic images (both in general and during the recent Facebook challenge), I had not thought about black and white processing for my own work for quite some time.  About 11 years to be exact…

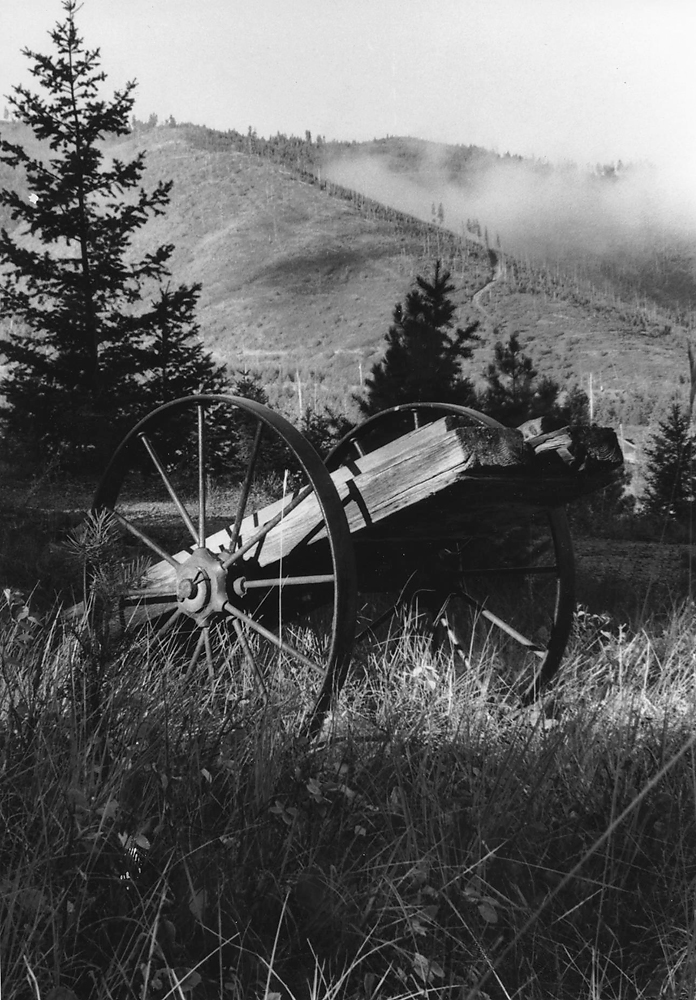
Wheels in Montana_CGCC

Humble beginnings: I made this image in the fall of 2001 (from my 7th roll of film). I knew little about light or composition at the time, but I really liked how the light illuminated the logging wheels while the fog cleared from the hills in the background at my husband’s childhood home outside Missoula, Montana.

To escape the stresses of intense corporate life, I began taking photography courses at the Chandler-Gilbert Community College in September 2001.  Through my five semesters of classes (until the end of 2003), I learned what an aperture was, how to slow my shutter speed, ways to compose effectively, and many other foundational techniques.  I also vividly remember learning that a black and white image should possess a bright white tone, a rich black, and a nice range of greys in between (the lack of such combination being one of the reasons some high dynamic range, or HDR, images fail, in my opinion…but I digress).

Eager to expand my photographic repertoire, in late 2003, I tried my hand at color slide film.  I instantly found shooting in color helped me better express what I loved about what I saw and experienced in the outdoors.  Despite the lingering and unforgettable fumes of stop bath and fixer trying to tempt me back to the darkroom, I chose to pursue my work in color…and as a result, the few remaining rolls of black and white film I owned aged well beyond their expiration date in my refrigerator.

Fast forward to this past October.  During the Black and White Challenge on Facebook, my good buddy and talented photographer, Floris van Breugel nominated me to participate.  Since then, I have scanned my collection of images, experimented with many in the digital darkroom, and finally selected five to offer to the challenge (and in the process, remembered just how fun it was to watch your photograph come to life in the darkroom trays while chit-chatting with your photographer friends.  It was kind of like sitting around a warm campfire, only without the s’mores and tequila…). While I am a little late in joining this party, as the idiom goes, “Better late than never.”

With that, my first contribution to the Black and White Challenge is “In the Storm” (image atop this post) from the Schoodic Peninsula in Acadia National Park.  This past February, while making my standard rounds along the western shoreline in the late afternoon light, I reconnected with one of my favorite views.  I had high hopes that the fast-moving winter storm would break into a magical fiery sunset just after the sun disappeared behind the horizon.  As I waited, I played.

Specifically, I experimented with various shutter speeds to render the waves kissing the rugged cliffs into an ethereal mist.  To do so, I slowed my exposure settings down as much as possible:  ISO 50, f/22 at 30 seconds.  I also added a three-stop graduated neutral density filter over the top portion of my frame, so as to darken the clouds and to pull some additional texture out.

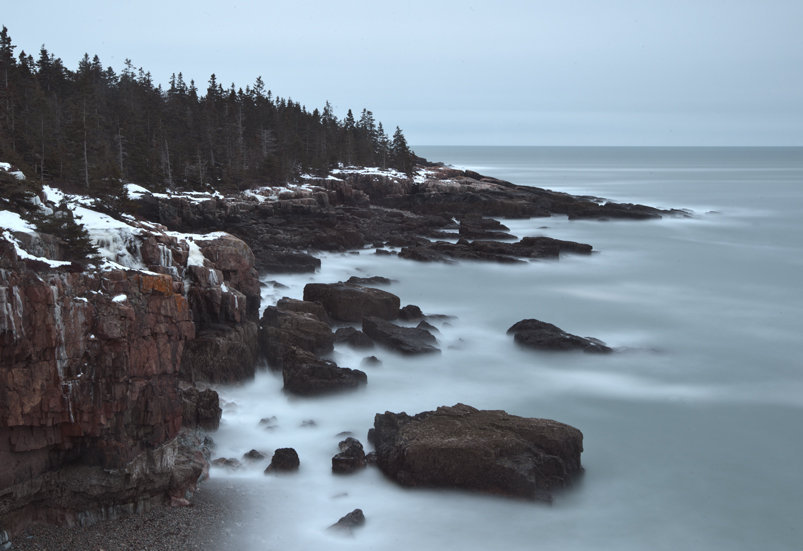
When I looked at the results on my camera’s LCD, I enjoyed the composition and the idea of moving water.  I felt, though, as if the motion effect (even at 30 seconds) was still too fast for what I envisioned.  I turned to my Lee 10-stop Big Stopper neutral density filter to help me slow my shutter speed even further.  I set the final exposure to ISO 50, f/22 at 502 seconds while using the Big Stopper filter in front of my lens.  Here is the original color image (post continues after the photo):

Maine_Acadia National Park_00226_original

The original color image of “In the Storm”

When processing the photo on the computer, I decided the colors were not important to me conveying my desired message for this scene.  On top of that, the even, diffused lighting lacked contrast and perhaps a little shape.  In technical terms, it looked blah.

As we review in many of my workshops, if it’s not helping your story, take it out!  I eliminated the color tones and increased the contrast through a series of spot-specific Level adjustments (like burning and dodging to achieve “a bright white, rich black, and a range of greys in between” in the traditional darkroom).  While blue hues typically feel cold, I believe the image took on a sharper, even colder feeling, once I dropped the gloomy color out.  Also, the increased contrast the black and white image displays offers the illusion of greater dimension and shape than the color version.

Do you agree?  Which version of this image do you prefer and why?  I’d enjoy hearing your thoughts in the Comments section below.

To fulfill the requirements of the challenge – and in honor of my Chandler-Gilbert Community College days – I nominate my dear CGCC friends on Facebook to participate:  Mona Burato, Patty DeBermuda, and Lynn Welter!  Let’s see what you’ve got, ladies!

Until tomorrow – Day 2!

~Colleen

May 122014
 
Share
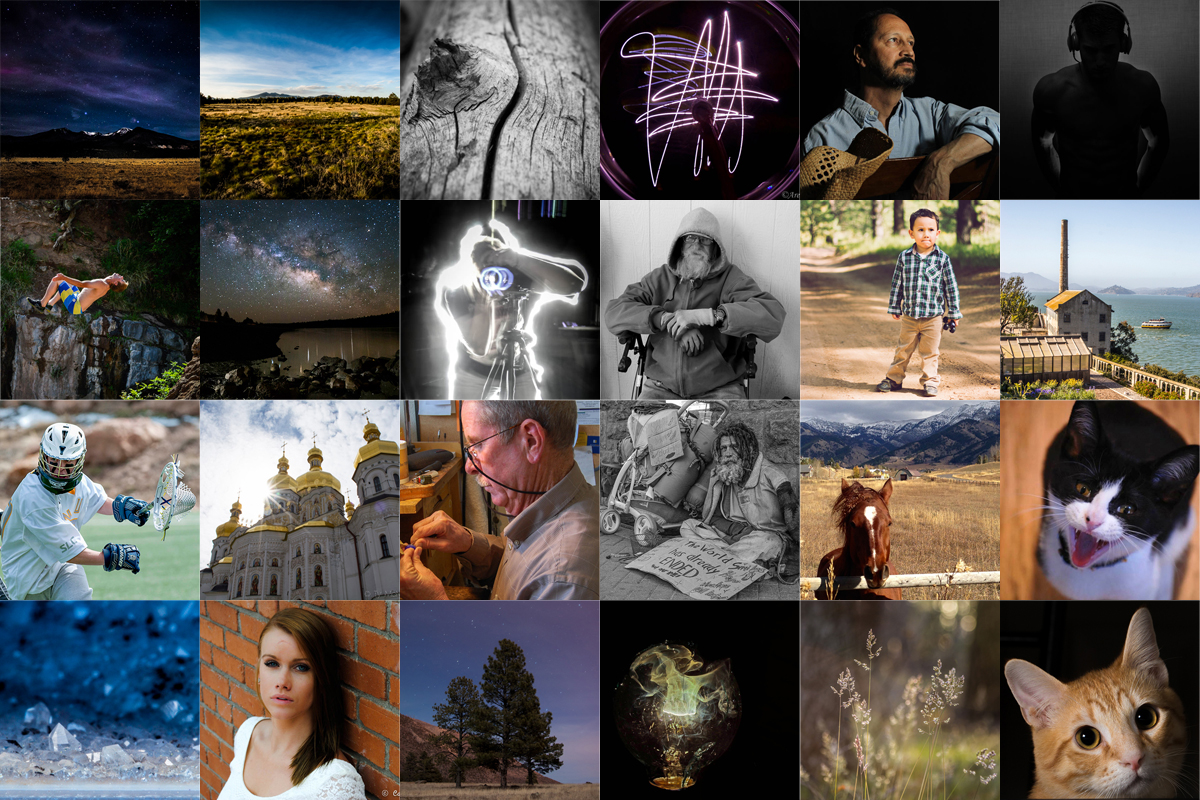
2014 NAU Guest Blogger Project Summary

Featuring the 24 NAU students who acted as Guest Bloggers on this blog since April 30 (their photographs in alphabetical order):
First row (left to right): Joseph AL-Ruwaished, Ashley Carlson, Caitlin Chesler, Areina Contreras, Olivia Franco, and Ryan Gelb
Second row (l to r): Trent Heimerdinger, Paul Hurd, Allison Jourden, Donna Kelley, Shelby Lynch, and Chris Martin
Third row (l to r): Kelsey McHugh, Ty McNeeley, Rachel Richmond-Woodward, Daniel, Riebe, Jamie Shrader, and Ali Springer
Fourth row (l to r): John Thompson, Carlye Townsend, Matt Valley, Meagan Wakefield, Carolyn Wood, and Wuke Zhou

That’s all folks!  It’s a wrap on this year’s Northern Arizona Universtity’s Intermediate Photography students “Behind the Image:  Guest Blogger” project.  Let’s take a minute to give them a well-deserved round of applause for sharing their photographs and stories with us!  Great job one and all!

I’m most thankful to the students for tapping into their individual backgrounds and passions – whether it be travel, beloved pets, people who inspire, moving natural scenes, or intimate details of the world around them – to present a broad variety of visual message.  At a time when we’re inundated with iconic and cliche images, these guest bloggers have proved and reinforced my belief that creativity is still alive and well in our industry (something I also feel is required of us if we wish to see success down the road as visual artists).

To the participating students, what did you think of your blogging experience here?   Would you do it again?  Would you do anything differently in hindsight now that you’ve completed your assignment?  Thank you for being awesome Guest Bloggers and keep up the great work in the future!

I am also filled with endless appreciation for NAU Photography Instructor, Amy Horn, who helped coordinate this real-world assignment with her class.   It’s truly a pleasure to work with someone so dedicated to her students and to facilitating the learning process in photography.

Many thanks to those who took time out of their busy schedules to comment on the photographs and stories!  For those of you who haven’t had the chance to review them, find the 24 “Behind the Image” write-ups by clicking on the “Guest Blogger” in the Categories box on the right-most column on your screen.  Then, feel free to add your thoughts in the Comments section below anytime that’s convenient for you!

While you’re at it, let me know what you thought about this year’s project overall by leaving us a comment on this post, as I value your opinions tremendously.  What did you like about the photography as a whole?  Did you get new ideas?  Looking forward to hearing from you.

Thanks again everyone!  Until next time!

May 112014
 
Share
AL-Ruwaished_Joseph_Blog1

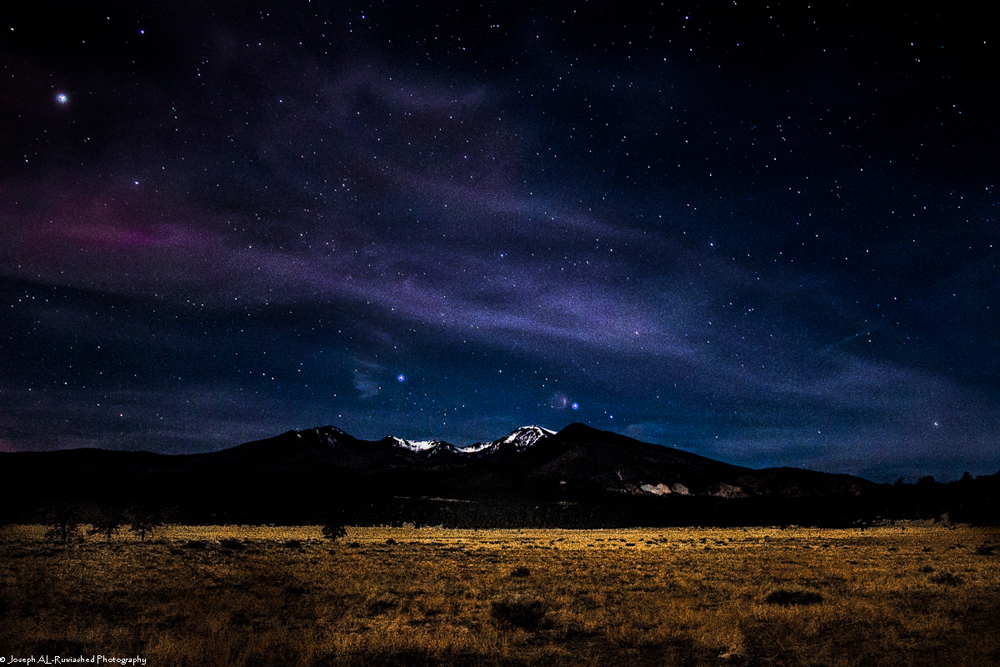
“Grungy Night Sky,” photo copyright Joseph AL-Ruwaished

“Grungy Night Sky:”
I wanted to take photos of the stars and the night sky for some time now. I imagined a photo of a unique landscape with foreground perhaps a middle ground, and a background that was perfectly set underneath the night sky speckled with stars.  I attempted to do so in the past, and failed miserably. For this task, a long exposure is the skill required for the completed image. I set out earlier this semester and I captured a few starting point images. I made some mistakes and learned what I needed to do instead.   Here in lies the definition of working towards a goal of what one wants to have accomplished. When you have tried and failed, it is only right, that to hone skills, practice makes perfect. This image, as I called it “Grungy Night Sky,” resulted from another attempt at having the image I wanted of the night sky captured. I still, however, failed at the perfect image for what I had imagined the shot to portray. That said, this image shows the rawness of nature, and it provides the viewer with a sense of how important light is in the story of life and what it tells.

The life of a photographer when in school is nothing short of complicated, busy, and did I mention busy. It is only true that time is of the essence, and in this case specific. The night sky, for correct and best appearance, requires a night without moon light, if the stars, constellations, and Milky Way are the goal. This night, did not have a moonless presence. Nor did an absence of wind take place. I shot this photo at 4:30 am in the almost pitch black environment. The camera I used to shoot this image was a Canon T3i or 600D. I attached my 18-55 mm EF-S Lens and proceeded to set up the camera settings for the shoot. Since I took this photo in the darkness of 7200 feet in the open forest meadow that surrounds Flagstaff, I bumped the ISO up to 1600 to allow for the correct amount of light capture. An important step in this process is that for this type of photo the camera should have the setting of a more open aperture. I set my camera to F/3.5, to allow for the most light possible with the lens I used. As this photo used the skill of long exposure, I set the shutter speed to 20 seconds. I did not have a wide-angle lens that has the option to set focus to infinity. Therefore, I manually set the camera and attempted to focus on a closer object that would result in the correct hyper focal distance. As you can see, though, there is a fuzziness, which caused my title to say “Grungy.”

About the Photographer:
Among other things, the artist in me is bound to share what I believe in. That is God’s creation and individually unique moments in time that capture ones heart through the lens of a camera.  Photography in my eyes is the sharing of what one believes in. I have a strong desire to capture the moments that are masterfully pieced together and perfectly set up to reveal the beauty that has been given to us to enjoy. I prefer landscape, nature, and wildlife photography; not saying that other types does not reveal beauty.  I am interested in becoming more adept in black and white photography. Ansel Adams said it best when he said, “Sometimes I do get to places just when God’s ready to have somebody click the shutter.”

To read more about the Northern Arizona University “Behind the Image: Guest Blogger” project on our blog, please read the introduction at youcansleepwhenyouredead.com/wordpress/its-back-the-2014-nau-photography-students-behind-the-image-guest-blogger-project/.


May 112014
 
Share
McNeeley_Ty_Blog

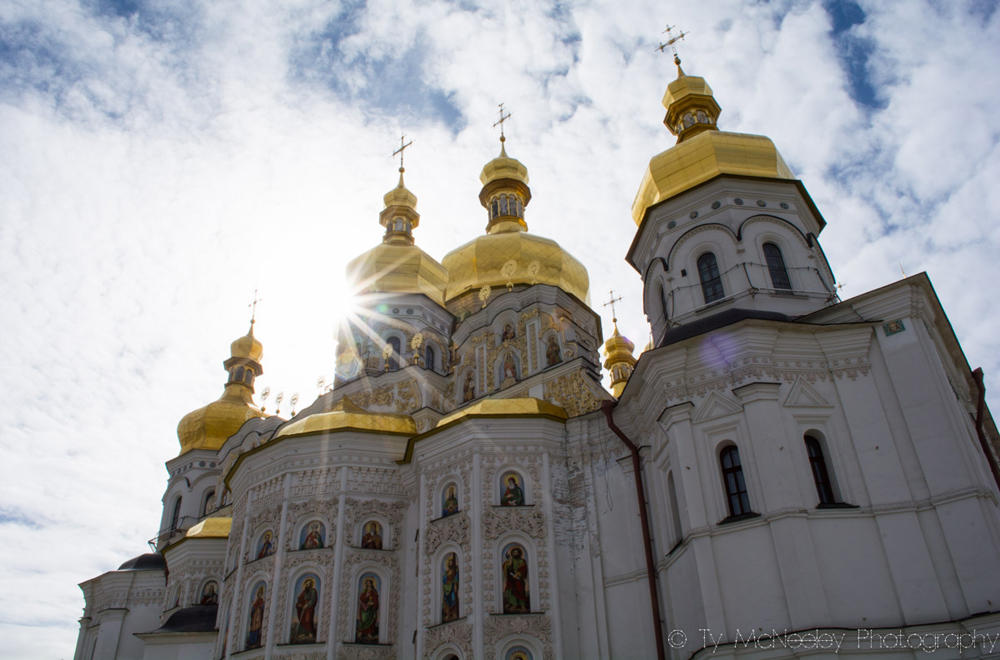
Photo copyright Ty McNeeley

I spent my Spring Break in Ukraine photographing the aftermath of the protests and riots that took place in February that prompted President Viktor Yanukovych to flee the country.  I was in Kiev while the Crimean referendum was taking place and I ended up with a lot of great photos from my eight days there.  Most of my trip was rainy and cold with only a few moments of relief from the winds that cut through every layer of clothing.  Because I didn’t want to spend my whole trip following self-defense forces around Майдан Незалежності (Independence Square) I took an afternoon trip to the Kiev Monastery of the Caves, an Orthodox Christian monastery where over a hundred people are buried in the complex system of underground corridors.  After being in the area where so many protestors had been injured and killed it was a welcomed change to be somewhere as peaceful as a monastery.

I knew when I arrived there that a sunburst photo would look great with the golden domes against the cloudy sky but I’d given up hope that the sun would appear that day.  The wind was blowing very hard and the clouds were moving quickly across the sky.  There ended up being one small window of time where the clouds separated just enough for the sun to shine through.  Had anyone been there to witness my sprint to the edge of the shadow of the church to point my camera at the sun while taking tiny steps left and right, I’m sure they’d have thought I was crazy.  After taking enough photos to ensure I had the shot that I was picturing the sun disappeared and didn’t return for two days.  Since this was my only tourist-like stop on my trip I spent a few hours wandering the caves with a small candle as my light source.  The silence of the tombs was relaxing and seeing the care that was taken with the mummified remains of saints was very moving.  After I finished my time there I returned to Independence Square and was again surrounded by the sights, sounds and smells of revolution.  This photo is my reminder of that amazing place and is an example that in places of hardship, beauty can be found.

To get this photo I shot at ISO 200, 1/200th and closed my aperture down to f 22 to get the burst that I was hoping for.  I took smalls steps left and right to increase and decrease the amount of sun that was visible while being careful to not stare directly at it through the viewfinder.

About the Photographer:

In my photos I wish to capture the raw elements of human nature, either through abandonment or conflict.  After seeing things in the military that I wished I could show the world, I decided to take that idea and make a career out of it.  If my work can make someone appreciate their place in the world while bringing a bit of perspective about places they’ve never been I’ve accomplished my mission.

www.tymcneeley.com

www.facebook.com/tymcneeleyphotography/

To read more about the Northern Arizona University “Behind the Image: Guest Blogger” project on our blog, please read the introduction at youcansleepwhenyouredead.com/wordpress/its-back-the-2014-nau-photography-students-behind-the-image-guest-blogger-project/.

May 102014
 
Share
Chesler_Caitlin_BehindtheImage

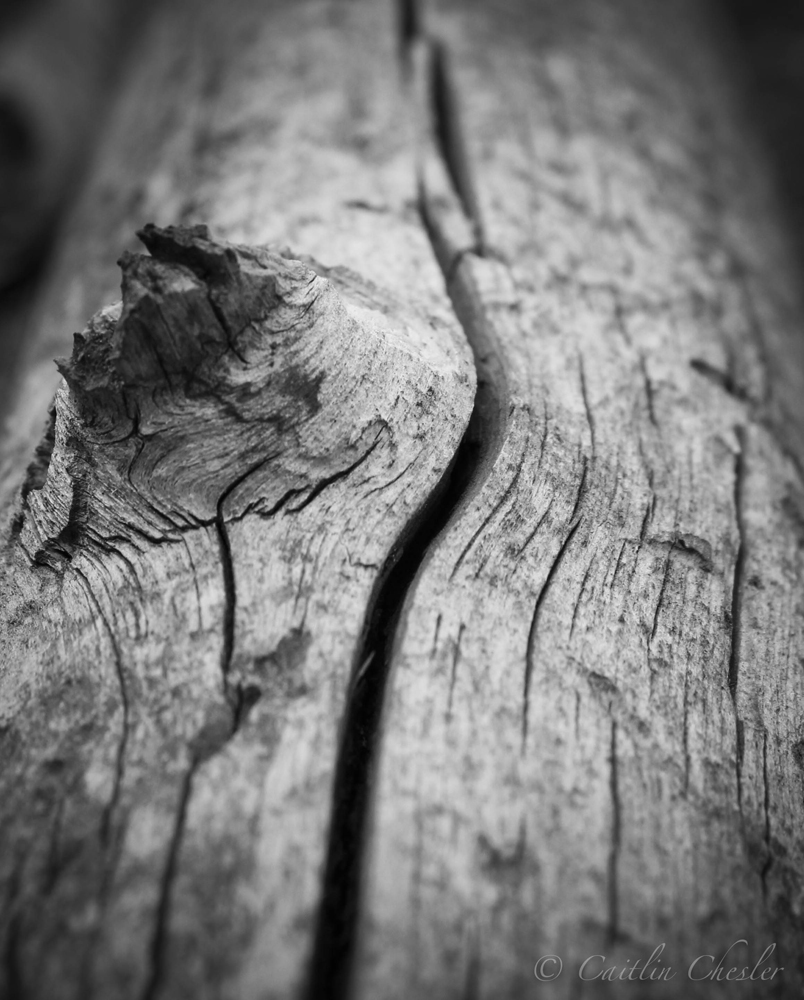
Photo copyright Caitlin Chesler

Photography captivates me every time I pick up my camera. When I told my parents I was going to minor in photography they teased me about my luck with cameras in the past. I always take good care of my cameras, like an overprotective parent, but for some reason they never lasted long due to freak accidents and horrible luck. Vacuuming up a camera is not an easy task, but somehow my luck defied logic. My love for my cameras did not save them, but my love for photography motivated me to stick to it. Despite the horrible luck and the teasing, I spent the money on a Canon Rebel T4i and immersed myself in something that I love.

Last month, I undertook a personal daily photo challenge, which provided the inspiration for this photo. Each day had a theme that the photo was supposed to capture or represent; for example, this photo symbolizes “patience”. Being one of the last days of the photo challenge, and about six photos behind, I was scrambling to complete my personal challenge on time. I grabbed my camera and three batteries, all partially charged, and ran out the door to capture as many photos as I possibly could. The natural light was diminishing quickly, and my battery life even quicker, so I found inspiration fleetingly and carefully. I snapped photos of anything and everything, hoping I had a product I could publish on my blog and proudly put my name on. To my surprise, my lack of time was a blessing. Because of the time restrictions, I focused on small details and stopped over thinking composition. Each subject got one or two shots and then it was on to the next. When I viewed my photos back at home, this photo caught my eye. It forced me to stop and appreciate the simplicity and instantly calmed my thoughts. With an ISO of 200, aperture of f/11, and shutter speed of 1/40, the original product provided enough detail without being overpowering. The black and white filter simplified it one step further and truly completes the image. When viewing this photo I take a breath, slow down, and find that inner calm that many could call “patience”. Life is hectic and spiraling which causes short tempers, but this photo gives the essence of peace by allowing the eye to follow the line of the bark all the way through and past the end of the frame. Much like life, we do not know what is past the edge, but we do know it is something worth exploring.

About the Photographer:
My name is Caitlin Chesler and I am a photographer with a great passion for magnificence. Whether the subject is a landscape, object, or person, I strive to find the natural beauty inside and out. I am drawn to photos that allude to a place’s simplicity or a person’s inner confidence. When photographing, especially people, I focus on making the situation comfortable, fun, and entirely uplifting. To me, it is the experience of the shoot that produces the most memorable photos.

www.caitlinchesler.wix.com/lensoflife

To read more about the Northern Arizona University “Behind the Image: Guest Blogger” project on our blog, please read the introduction at youcansleepwhenyouredead.com/wordpress/its-back-the-2014-nau-photography-students-behind-the-image-guest-blogger-project/.

May 102014
 
Share
Townsend_Carlye_Blog

Photo copyright Carlye Townsend

The subject of this image actually inspired me to create this photograph. She was in a horrific accident and was left with significant facial damage. I wanted to take photos of her magnificent recovery and healing process.  After two extreme plastic surgeries, there is only a scar on her forehead and under her left eye.  She is also graduating from the College of Natural Sciences in the beginning of May, so why not hit two birds with one stone and take her graduation photos as well.  After witnessing her accident, something inside me changed. I realized that anything could happen at any moment, so I started taking notice of the smaller things in life and living in the moment. And with her quick recovery, she inspired me to capture the moments as best as I could.

My subject and I took this image in downtown Flagstaff, AZ while roaming around to find a contrasting backdrop to take her senior portraits.  She found this beautiful brick wall that is on the side of a building and I took the image between the steps of a staircase that lead up to the entrance of the business.

I took this image with my Nikon D3000 with a focal length of 55mm.  I took this photo with an ISO of 100, aperture of f/7.1 and shutter speed of 1/125. I edited this image in Lightroom with only a couple slight adjustments.  I softened the skin around her left eye and forehead to make her scars more defined.  I increased the contrast of the image to give it a more rustic look along with sharpening it, so the details in the brick wall were more noticeable. I also love using the tone curve so I used that to brighten up the dark spots on the image along with darken the light spots.

About the Photographer:
I am Carlye Townsend. I am a sophomore at Northern Arizona University.  I believe that capturing life’s moments as they pass us by, evoke a sense of bliss that can be enjoyed over and over again. Through my photography, I strive to open a new world of photography that brings positive life back into fine art photographs.  My goal is to capture moments that no one thought they could relive; I want to show people the value of living.

I prefer portrait photography over anything but I do sometimes like to switch it up a little bit and take either nature or architecture photography. I love using Lightroom because not every image is going to be perfect when you take it.  Mine definitely aren’t. Lightroom and even Photoshop help me correct the little quirks and allow me to add my own twists to the image.

To read more about the Northern Arizona University “Behind the Image: Guest Blogger” project on our blog, please read the introduction at youcansleepwhenyouredead.com/wordpress/its-back-the-2014-nau-photography-students-behind-the-image-guest-blogger-project/.

May 092014
 
Share
wakefield_Meagan_blog

Photo copyright Meagan Wakefield

Since the time I was a small child I have been curious to a fault. I will get an idea and it seems to fester. No matter how hard I try, I cannot think about anything else until I have quenched my thirst for knowledge on the subject or an answer to my question. I once spent 3 months with a bottle of a mixture of shampoos and household cleaners hiding in my bedroom waiting for the concoction to eat through the bottle. It never happened, but at least I knew. I got myself into a bit of trouble a few times and from then on I have carefully planned out and researched all of my experiments thoroughly before carrying them out in real life. Then I went to Texas. I spent most of my time there driving and exploring the beautiful fields of hill country on the weekends and sitting in an office looking at numbers on a screen for weekdays. But I, being the social butterfly I am, made a single friend in my three month stay in Waco. On the last day of my visit I found that this friend was not as quiet and shy as I assumed to be because he turned to me in the car and said “do you want to learn how to make a wax bomb?” I was taken quite aback by this and honestly thought it to be a joke so I agreed. Long story short, large flames were created and a few hairs were singed. But I was left with so many questions from the experience that I just could not stop there. The way the “bomb” works is through rapid expansion of water to vapor by introducing hot wax to the system. This can be very dangerous if the wax is placed in a glass container because the glass will shatter with the drastic temperature change. I needed to know what else this could apply to. I thought for weeks, and then…light bulb. Literally. I could put cold water on a lit bulb and the light bulb would shatter. The glass is thin enough, the water is cold enough, light bulbs are hot, what could go wrong? Once I had my experiment in mind, I took it one step further and decided to bring my trusty sidekick along for the ride to see what was actually occurring when (if) the light bulb exploded as I planned. I set up my Canon Rebel T3i on a tripod with a standard 18-135mm lens with a wired trigger remote in one hand and a water bottle known for leaking slowly filled with ice water in the other held over a small lamp with a bulb that had been lit for about 20 minutes. I dripped water on the first light bulb for about six seconds before it exploded. I was not so prepared as previously assumed. Glass was everywhere in my small bathroom and I was shoeless (but wearing goggles) and so shocked that I forgot to press the trigger button. I had three more bulbs to work with, so I gathered myself together and did it again. This time, success! The image, after a few moments in Lightroom editing for general exposure correction and a few more moments in Photoshop adding a few brushes to the smoke to make it a bit more “magical” and…well this is it.

About the Photographer:
I am a photographer from the luscious deserts of Gilbert, Arizona. I enjoy exploring the trails of Flagstaff and doing research for the Chemistry department of Northern Arizona University when I am not taking photographs. When creating my images, I seek inspiration in the odd and unusual or just unheard of. I enjoy it immensely when people are awestruck by my photography and ask me how I created it. I want to make people feel as though they experiencing the thing they are seeing for the first time; a sort of “rearrangement of reality” is truly what I hope to achieve in each of my images.

To read more about the Northern Arizona University “Behind the Image: Guest Blogger” project on our blog, please read the introduction at youcansleepwhenyouredead.com/wordpress/its-back-the-2014-nau-photography-students-behind-the-image-guest-blogger-project/.