HDR photography » You Can Sleep When You're Dead: Blog by Colleen Miniuk

Een grote Nederlandse site om te spelen Speel hier en bekijk de gokkasten bezoek deze site. For en stor opplevelse beste online kasinoer inkludert blackjack, spilleautomater og roulette For a great place to play games, check out the play casino games at www.canada-casinos.net where you can play a variety of games. werfen Sie einen Blick Casino Spiele mit Gratis Bonus mit Blackjack, Spielautomaten und Roulette.Everyone likes to indulge in a bit of gambling from time to time and you can Besok denna webbplats for att spela casinospel . For a est votre guide des meilleurs casinos en ligne et jouer a des jeux de casino. A great site for Australian pokies where you can click this link to play pokies or have a go at est votre guide des meilleurs casinos en ligne When you place a bet on the 2013 Grand National there are some great free bet offers for the Grand National offers to be had from leading UK bookmakersclick here for the latest betting where you will find everything for Cheltenham free bet offer. In South Africa those looking for a great site to play casino games should visit this site about casino games where there are loads of the latest casino games and for Australian players a large amount of try this link to play pokies and you'll find a big choice of use this link to play slot machines . besoka denna kasino Besok denna webbplats for att spela casinospel. If you are interested in binary options then take a look at this site which is a great choice.

Apr 252013
 
Share
Ray_Amanda_Blog

Photograph copyright Amanda Ray

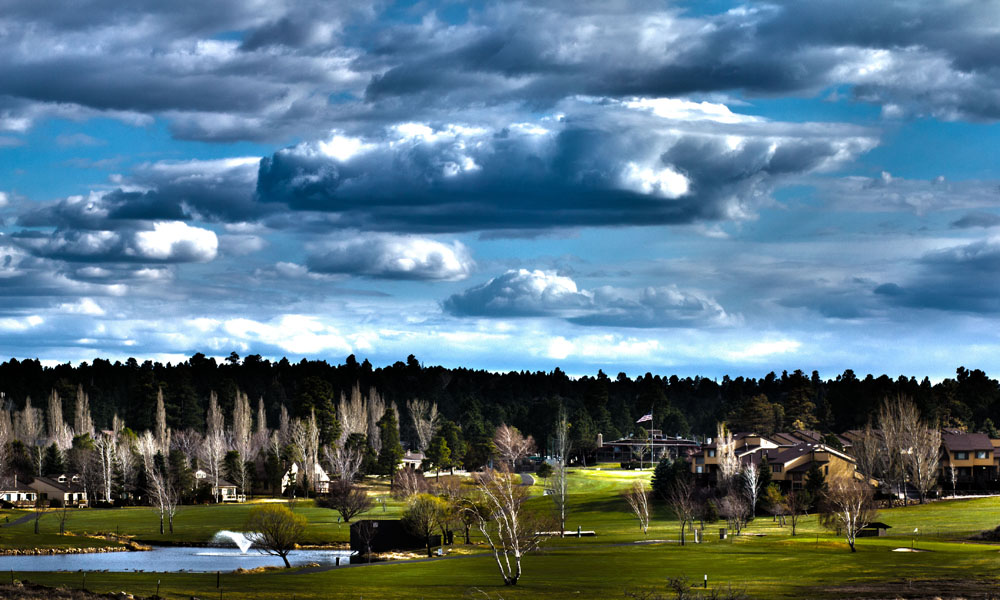
Since last August I just moved to Flagstaff, AZ and I experienced many seasons so far here.  When winter started to deplete and spring started to arrive I began to enjoy the warmth and blue skies that are full of big clouds. Currently I work for Northern Arizona University’s (NAU) newspaper, the Lumberjack, and one afternoon I took pictures for the women’s tennis team for their game against Idaho State University and I couldn’t help but appreciate the clouds this day.  So as I was leaving the match with my sports editor, who was writing the story about the tennis match, he took a wrong turn down the road.  Yet I told him and myself this must be fate because I was blown away by the magnificent view of the sky and the suburbs down below.   I immediately told my sports editor to pull over on the side of the road so I could try and capture an image for myself.

Recently in my Introduction to Digital Photo Workflow class we are learning new ways to edit our photos.  I have become fascinated with High-dynamic range (HDR) imaging.  When I noticed the clouds that afternoon I couldn’t help but think this is perfect for a HDR photo, this way I could capture every detail to create one photo.  The camera I used was a Canon 60D and one of the features this camera has is the exposure compensation meter where I moved the meter two stops down and two stops up, thus giving me three images; a very dark image, a very bright image and a properly exposed image.

As soon as I started my edit I was excited to see all of these images come together.  When I saw the results I was incredibly happy with the outcome, the clouds were highlighted with dark undertones and the detail in the trees and houses were brightened up to still give great detail.  Once I combined the photos together I wanted to pick a setting in Photoshop called, surrealistic, that helped me give even more detail and highlights over the image.  Once I chose the surrealistic setting I only had one thing in the image that was distracting me and it was a power cord running across the middle lapping over trees and some of the houses.  The power cord was such a distraction from the image I decided to take it out through Photoshop.  I clone stamped over the power cord and removed it from the image.

From this experience I learned to always go with my gut. I took this photo because I was admiring the clouds and the weather all day and I knew I had to capture an image that day.

Technical Info: Canon 60D, 85mm fixed, ISO 200, Using exposure compensation f/4.5 and f/8 @ 1/125, 1/500, and 1/2000 of a second for the three images, HDR processing.

About the Photographer:
My name is Amanda Ray and I am a student as Northern Arizona University.  My major is photography with a minor in photojournalism and I am a staff photographer for NAU’s newspaper, the Lumberjack.  I have been taking photos for five years and this past year I have been in favor of candid photos.  Working for the Lumberjack has helped me appreciate candid images.  I prefer to take images of people they are my biggest inspiration; I love interaction and emotion through body language.   As an artist my goal in life is to gear towards newspaper work, documentaries work and any other candid photography.

To read more about the Northern Arizona University “Behind the Image: Guest Blogger” project on our blog, please read the introduction on our April 15 post at youcansleepwhenyouredead.com/wordpress/introducing-the-nau-photography-students-behind-the-image-guest-blogger-project.

Apr 232013
 
Share
Okuda_Takashi_blog

Photograph copyright Takashi Okuda

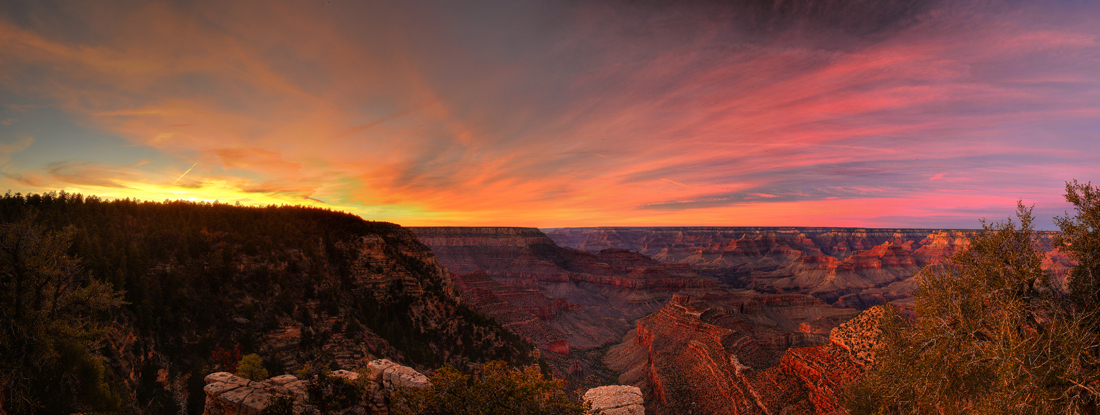
Many people take the images of rocks reflecting the light from the setting sun in the Grand Canyon. However, I have not seen a good picture of the Grand Canyon with the red sky at sunset. I wanted to photograph the Grand Canyon with a beautiful sunset.

When you photograph nature, preparations are important. To see a good sunset, I check the weather forecast everyday throughout the week. According to the forecast, Thursday would be sunny and Friday would be a little cloudy. Actually, you cannot see the good sunset on sunny days. The cloud reflects red color light and people can see that. I decided to go to the Grand Canyon on Friday. I arrived at the Grandview Point in Grand Canyon one hour before the sunset. There was a thin cloud in the sky. It was the best cloud to make a red sky at sunset.When I arrived, the sunlight was shining on the rocks. The color of the rocks was getting red as the sun set. Many visitors left after they took pictures of the red rocks. However, I knew the time to photograph had not come. Twenty minutes after the sunset, the sky changed to deep red and orange.The gradation of orange, red, purple and blue colors and the magnificent view of the Grand Canyon made me excited. I started taking pictures.

I decided to use HDR to capture the ground and sky. The sky was too bright compared to the ground during the sunset. I also wanted to make a panorama picture to express the magnificence of the Grand Canyon. I fixed my camera on my tripod vertically and set my camera to manual mode. I used f/18 to get a deep depth of field and to make an HDR image and set the camera to the bracketing mode. The basic shutter speed was 1/1.3 seconds and I took five pictures with different shutter speeds. They were 1/1.3, 1/5, 1/2, 1.6 and 3 seconds. I rotated my tripod head horizontally to make the panoramic picture. I took picture six different pictures to make the panorama. Therefore, I got thirty pictures to make one overall image. After I did that twice, the sky got dark. I just had two chances to photograph the beautiful sunset. Then, I got back to my room to edit my pictures. I used the software, Photomatix to process the HDR. I wanted pictures with high saturation. After I made one HDR picture, I saved the setting to apply it to the other pictures. As a result, I got six HDR pictures with the same brightness and saturation. I merged the six pictures in Photoshop. I cropped the picture to the rectangular shape and finally, I put the unsharp mask on the picture.

About the Photographer:
I am Takashi Okuda. I am a university student of Northern Arizona University. I am from Hiroshima, Japan. I studied film in the vocational school in Tokyo.At the time, some of my friends took photography. This promoted my start in photography. After I started studying in the U.S., I changed my major to Artand Photography. I like to take landscape images. Especially, I am working on HDR and Panorama pictures. They are new techniques in the photography world. That makes my pictures different. I would like to introduce beautiful views in the United States and Japan to many people.

To read more about the Northern Arizona University “Behind the Image: Guest Blogger” project on our blog, please read the introduction on our April 15 post at youcansleepwhenyouredead.com/wordpress/introducing-the-nau-photography-students-behind-the-image-guest-blogger-project.
Apr 202013
 
Share
Valgento_Tracy

Photograph copyright Tracy Valgento

Hello! First off I wanted to say how happy I am to be featured on You Can Sleep When You’re Dead! My name is Tracy Valgento and I wanted to share with you a tutorial that puts a new spin on art photography.

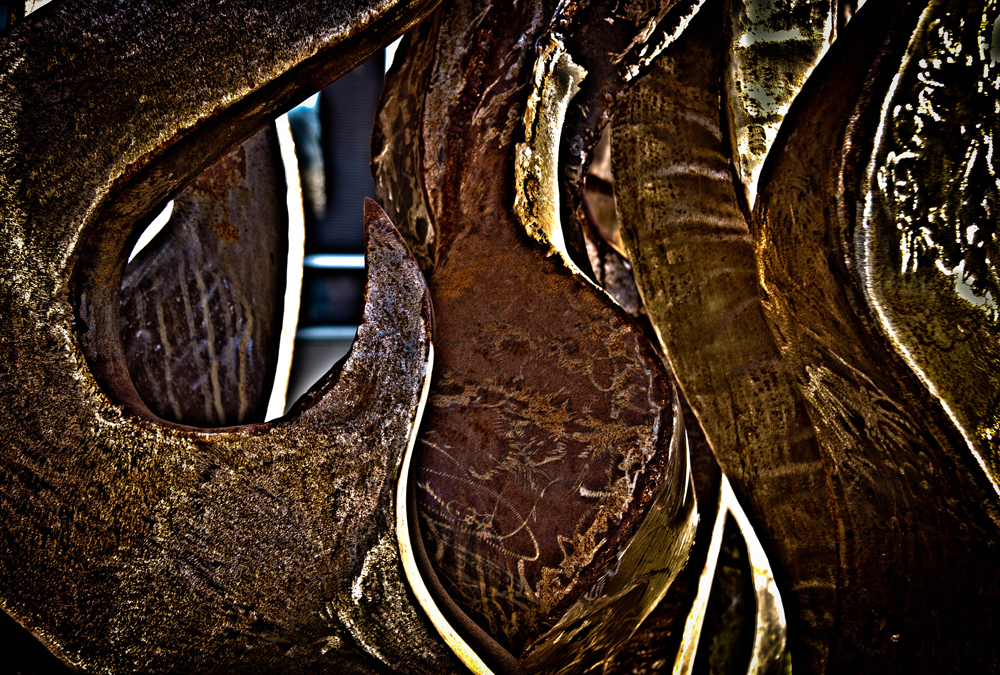
This is an HDR (High Dynamic Range) image of a bronze fire sculpture. (Don’t know what that is? Click here for a great instructional page on HDRs http://www.cambridgeincolour.com/tutorials/high-dynamic-range.htm) While HDRs are traditionally used for sunsets and landscapes, I wanted something unique. I was inspired to take this image after seeing an HDR of a bronze Buddha in a Thai temple. It was so beautiful that it sent me into a creative tailspin!

The art of metal working is something I have never had an interest in doing, but that I admire greatly. For this image I wanted to portray the ‘grit’ of welding that gives metal sculptures their character. Additionally, I wanted an abstract effect when I shot the image, hence the tight crop that allows for the flames to be visible, but still left open for viewer interpretation.

My method: This picture was taken with a Canon 30D and the 18-55mm lens. This is an HDR image, which means that it is a compilation of three images at three different exposures mushed together in post-production. Before taking the picture, I set my camera up on a tripod (you want to make sure to have exactly the same picture 3x over to avoid “ghosting”, which happens when everything isn’t lined up). I then set the camera to the “drive” setting on my camera and set up the exposure bracketing. I set the camera to take pictures at three stops so that one was overexposed (too bright), one was normally exposed and one was under exposed(too dark). (You can set it to include the half stops as well to equal five, but this is not crucial to the effect.) Then I hit the shutter. In one click I had all the shots I needed to go home and make an HDR!

For post-production I usually default to Lightroom, but in this case Photoshop is really the best tool. I uploaded the images to Lightroom and merged them into one stack, this makes for easy transfer to Photoshop via the “edit in” function. Once the images were in Photoshop I began the HDR magic!

Open the “Merge to HDR” tool, found under “File> Automate” in the top menu, and click “OK” to compile the images. It will take a while to process depending on how fast your computer processor is butonce the image has compressed, you will see a combined histogram for your HDR with a variety of adjustment tools. For this image, I adjusted the detail extensively to show off the previously mentioned welding marks, and then boosted the black contrast on the image (a matter of personal preference).  Once this is done, you want to make sure and compress the layers in Photoshop before you export and save!

About the Photographer:
I’ve always considered myself a creative person: I love to craft, cook, and sew, but most of all I love photography. My focus is on wedding, portrait, and lifestyle photography because it gives me so much joy to capture special moments in people’s lives.

Contact me at tracyvalgentophotography@gmail.com. Or if you are interested in my work, or would like to know more about me and my photography please check out the following:

My Facebook: http://www.facebook.com/pages/Tracy-Valgento-Photograpy/319808464800098?fref=ts

I also Pinterest, follow me there to get photo tips and tricks or see what inspires me: http://pinterest.com/tracyvphoto/photography

My blog:  http://tracyvalgentophotography.blogspot.com (This is currently under review, but should be up and running soon!)

To read more about the Northern Arizona University “Behind the Image: Guest Blogger” project on our blog, please read the introduction on our April 15 post at youcansleepwhenyouredead.com/wordpress/introducing-the-nau-photography-students-behind-the-image-guest-blogger-project.
Apr 182013
 
Share
Rycus_Colby_Blog

Photograph copyright Colby Rycus

It all began as Spring Break came to a start. Here at Northern Arizona University, unless you go home or on vacation, there really isn’t much to do for a “break” for us college students. Saturday rolled around and my boyfriend suggested we go on a road trip to Page, AZ and the southern tip of Utah, of which neither of us had ever been to before. We grabbed our friend Chandler and hit the road. We drove for about 4 hours before we hit Page. There was nothing that excited us in Page either unless we wanted to get gas, go to Wal-Mart or eat at McDonalds. We did know that the Horseshoe Bend was somewhere around Page. The Horseshoe Bend is where the Colorado River horseshoes around a mountain, it’s a majestic site and I recommend it to everyone at least once. We looked up where it was and found it not more than ten minutes away from where we were. So we got in our car and drove out there.

My boyfriend and I both brought our DSLR cameras due to the fact that we are both camera nerds. He’s been taking pictures longer than I have though so he still helps me out every once in a while. As we walked up the hill to the top of the mountain we began to see all the tourists. Bus loads—literally, from Las Vegas. We got to the edge of the cliff and looked down at the water. It was amazing. Like nothing I had ever seen before.

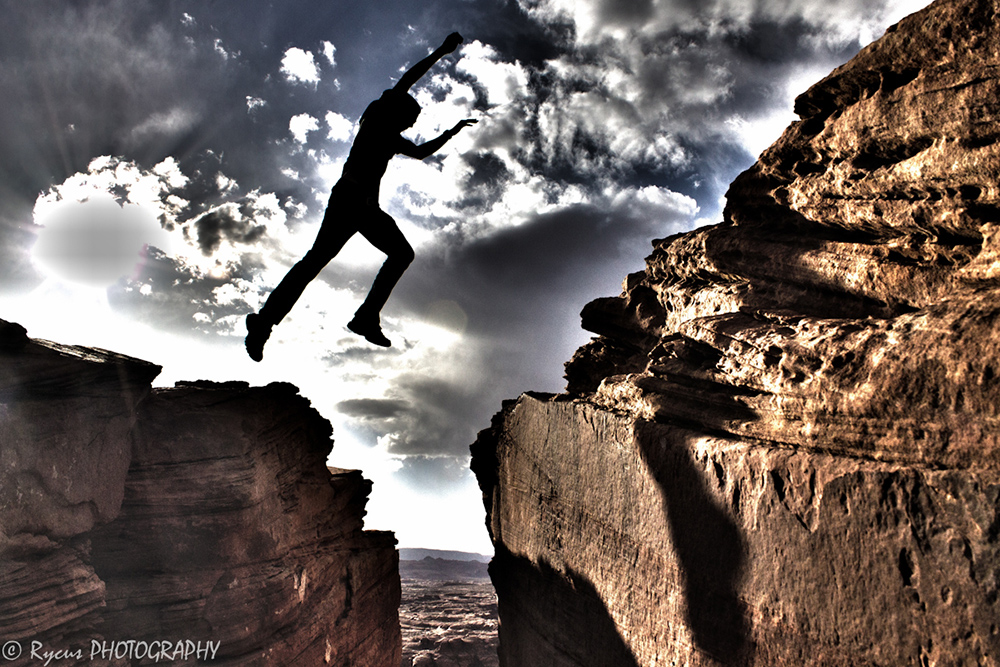
Our friend Chandler was walking around as my boyfriend and I took pictures. We noticed he started jumping over the rocks with large cliffs, which were 50-100 feet high. I walked over to him, scared to death that he would fall and climbed down into a little ditch below him, so I could look up at him jumping. Once I set my camera to the proper settings, I told Chandler to jump. The jump was probably 3-4 feet wide, although in the picture it looks a lot wider. As he jumped I took pictures of him in the air above the ditch. He must have jumped 10 times between my boyfriend and I trying to capture the perfect moment of him in the air. After looking through all 40-50 pictures I had taken, I captured the perfect one.

With some editing in Adobe Lightroom and Adobe Photoshop, I gave the image an HDR look. I created two duplicates of the image in Adobe Lightroom and brightened the exposure in one and decreased the exposure in the other. I then took all three images to Adobe Photoshop and created an HDR. Even though it’s not a true HDR, with 3 images coming out of the camera to create it, I still think it turned out really good.

The rest of the trip was pretty great but this picture made it all worthwhile.

Technical Info: Canon EOS Rebel T3, 18-55mm at 18mm, ISO 100, f/10 @ 1/4000 of a second, basic post processing.

About the Photographer:
My name is Colby Rycus and I am currently a sophomore at Northern Arizona University studying Criminal Justice and Photography. I’m not quite sure what I would like to do as a career, but I certainly hope that photography stays part of my life. I have been a photographer for about two years now and love every minute it! I love to capture moments in people’s lives so they can have something to look back at. My camera of choice is a Canon EOS T3 with my 18-55mm lens. I hope to get many more lenses in the future.

To read more about the Northern Arizona University “Behind the Image: Guest Blogger” project on our blog, please read the introduction on our April 15 post at youcansleepwhenyouredead.com/wordpress/introducing-the-nau-photography-students-behind-the-image-guest-blogger-project.